
<script src="text/babel">
function App() {
        let [counter, modifier] = React.useState(0);
        function onClick() {
            modifier(counter + 1);
        }
        return (
            <div>
                <h3>Total Click: {counter}</h3>
                <button onClick={onClick}>Click me</button>
            </div>
        );
    }

    ReactDOM.render(<App/>, root);
</script>
함수 내에서 useState를 사용하면, 해당하는 컴포넌트 전체가 리렌더링 된다.
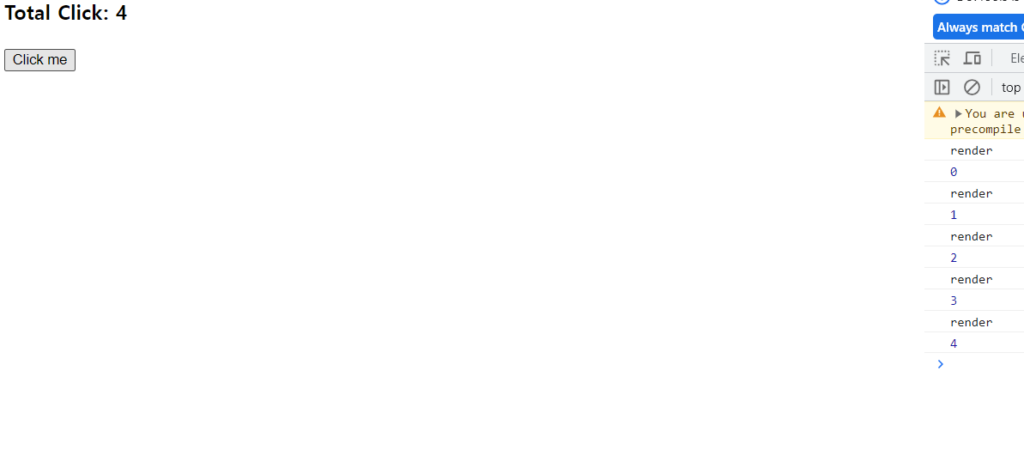
<script src="text/babel">
function App() {
        let [counter, modifier] = React.useState(0);
        function onClick() {
            modifier(counter + 1);
        }
        console.log("render");
        console.log(counter);
        return (
            <div>
                <h3>Total Click: {counter}</h3>
                <button onClick={onClick}>Click me</button>
            </div>
        );
    }

    ReactDOM.render(<App/>, root);
</script>
왠지 modifier가 onClick 함수에 들어가 있기 때문에, console이 찍힐 것 같지 않았지만, 위에서 말했듯 useState를 사용하게 되면 해당하는 컴포넌트 전체가 리렌더링 되므로, Click me 버튼을 클릭하면 console.log가 찍힌다.
<script src="text/babel">
	function App() {
	        return (
	            <div>
	                <h1 className="title">Super Converter</h1>
	                <label htmlFor="minutes">Minutes
	                    <input placeholder="Minutes" type="number"/>
	                </label>
	                <label htmlFor="hours">Hours
	                    <input placeholder="Hours" type="number"/>
	                </label>
	            </div>
	        )
	    }

	const root = document.getElementById("root");
	ReactDOM.render(<App/>, root);
</script>
HTML 태그에 사용되는 class와 for은, JavsScript에서 이미 사용하는 예약어이므로 사용하지 않는 것이 좋다. class 대신 className, for 대신 htmlFor를 사용하는 것이 일반적이다.
Props?
props란, 컴포넌트의 첫 번째이자 유일한 인자이다.
<script>
function Btn(props) {
        console.log(props);
        return (
            <button style={{
                backgroundColor: "tomato",
                color: "white",
                padding: "10px 20px",
                border: 0,
                borderRadius: 10,

            }}>{props.banana}</button>
        );
    }
    function App() {
        return (
            <div>
                <Btn banana="Save Changes" apple="save"/>
                <Btn banana="Confirm" apple="confirm"/>
            </div>
        );
    }
    const root = document.getElementById("root");
    ReactDOM.render(<App/>, root);
</script>
위의 코드 스니펫에서는 props를 받아들이는 컴포넌트를 생성하고, props를 사용하여 버튼의 텍스트를 변경하는 예제이다.
위와 같이 컴포넌트를 사용할 때, props를 통해 데이터를 전달하고 이를 활용할 수 있다. 예를 들어, 부모 컴포넌트에서 자식 컴포넌트로 데이터를 전달하려면, 부모 컴포넌트에서 props를 사용하여 데이터를 전달하고, 자식 컴포넌트에서는 props를 통해 전달된 데이터를 받아 사용한다. props는 읽기 전용이므로, 컴포넌트에서 직접 수정할 수 없지만, props를 통해 전달받은 데이터를 사용하여 렌더링하거나 다른 로직에 활용할 수 있다.
function Btn({text}) {
        return (
            <button style={{
                backgroundColor: "tomato",
                color: "white",
                padding: "10px 20px",
                border: 0,
                borderRadius: 10,
            }}>{text}</button>
        );
    }

    function App() {
        const [value, setValue] = React.useState("Save Changes");
        const changeValue = () => {
            setValue("Revert changes");
        }
        return (
            <div>
                <Btn text={value} onClick={changeValue}/>
                <Btn text="Confirm"/>
            </div>
        );
    }
App()의 Btn 컴포넌트에 onClick 메소드를 집어넣었지만, 위 코드는 작동하지 않는다. Btn 컴포넌트로 들어가는 무언가이지 button태그를 위한 이벤트 리스너가 아니기 때문이다. 따라서 onClick 이 실행될 수 있게 만드려면 아래와 같이 코드를 변경한다.
function Btn({text, changeValue }) {
        console.log(text + 'was rendered.');
        return (
            <button
                onClick={changeValue}
                style={{
                backgroundColor: "tomato",
                color: "white",
                padding: "10px 20px",
                border: 0,
                borderRadius: 10,
            }}>{text}</button>
        );
    }

    const MemorizedBtn = React.memo(Btn);

    function App() {
        const [value, setValue] = React.useState("Save Changes");
        const changeValue = () => {
            setValue("Revert changes");
        }
        return (
            <div>
                <MemorizedBtn text={value} changeValue={changeValue}/>
                <MemorizedBtn text="Confirm"/>
            </div>
        );
    }
추가로, 부모 컴포넌트에서 값 변동사항이 생겨 rerender가 발생하면, 하위 컴포넌트는 자동적으로 rerender 된다. 하지만 React.memo()를 사용해서, 변경이 발생하지 않는 컴포넌트는 rerender를 방지할 수 있다. Props가 변경되지 않으면 다시 그릴 필요가 없어진다.
React.memo()는 React에서 제공하는 기능 중 하나로, 컴포넌트의 렌더링을 최적화할 수 있는 방법이다. React.memo()를 사용하면, 컴포넌트의 props가 변경되지 않는 경우 해당 컴포넌트는 다시 렌더링되지 않으므로 성능 향상에 도움이 된다. 하지만 제대로 사용하지 않으면 오히려 성능이 악화될 수 있다는 단점이 존재한다.
React.memo()의 주요 장점.
- 성능 향상 :
React.memo()를 사용하면, 컴포넌트의 props가 변경되지 않은 경우 해당 컴포넌트는 다시 렌더링되지 않으므로 성능이 향상된다. - 코드 가독성 :
React.memo()를 사용하면, 컴포넌트가 언제 다시 렌더링될지 명확하게 파악할 수 있으므로 코드의 가독성이 향상된다.
그러나 React.memo()사용의 단점.
- 의존성 제한 :
React.memo()를 사용하면, 컴포넌트가 의존하는 props나 상태가 변경되지 않는 한 컴포넌트가 업데이트되지 않는다. 따라서, 의존성을 올바르게 설정하지 않으면 컴포넌트가 업데이트되지 않을 수 있다. - 오버헤드 :
React.memo()를 사용하면, 컴포넌트의 props를 비교하기 위해 추가적인 오버헤드가 발생할 수 있다. 따라서,React.memo()를 사용하는 것이 항상 성능 향상에 도움이 되는 것은 아니다.
따라서, React.memo()를 사용할 때에는 성능 향상을 위해 잘못된 방법으로 사용하지 않도록 주의해야 하며, 컴포넌트의 의존성을 올바르게 설정하는 것이 중요하다.
Prop-types
컴포넌트에 전달되는 props가 올바른 타입인지, 필요한 경우 필수 props인지 확인하는 것은 중요하다. prop-types는 이를 할 수 있는 패키지 중 하나이다. prop-types를 사용하면 컴포넌트의 props의 타입과 필수 여부를 지정할 수 있으며 개발 초기에 오류를 빨리 발견하여 디버깅이 용이해진다. prop-types는 prop-types 패키지에서 가져와 아래와 같이 사용할 수 있다.
import PropTypes from 'prop-types';

MyComponent.propTypes = {
  name: PropTypes.string.isRequired,
  age: PropTypes.number,
  hobbies: PropTypes.arrayOf(PropTypes.string)
};
위 예제에서는 prop-types를 사용하여 ‘name’ prop이 필수 문자열이고, ‘age’ prop이 선택적인 숫자이며, ‘hobbies’ prop이 문자열 배열임을 지정한다.
React App
node.js를 설치해주고
npx create-react-app [폴더이름]
을 실행해주면, 현재 디렉토리 기준으로 자동으로 react 프로젝트가 생성된다.
React App 테스트 중, console이 2번 찍히는 문제가 발생했다. GPT에게 물어보니 아래와 같이 답변해주었다.
💡 Strict Mode: If your app or component tree is wrapped in the <React.StrictMode> component, intentional double-invocations of render methods can occur in development mode to help detect side-effects. This behavior is intentional and is meant to help you catch unintentional side effects in render methods. This double logging will not happen in production.
Ensure you’re not using <React.StrictMode> in your application, or understand that it will lead to some functions getting called multiple times in development.
따라서 기본적으로 생성되는 index.js 파일에서
import React from 'react';
import ReactDOM from 'react-dom/client';
import App from './App';

const root = ReactDOM.createRoot(document.getElementById('root'));
root.render(
  <React.StrictMode>
    <App />
  </React.StrictMode>
);
와 같이 생성되어 있는 코드를 아래와 같이 변경해주었다.
import React from 'react';
import ReactDOM from 'react-dom/client';
import App from './App';

const root = ReactDOM.createRoot(document.getElementById('root'));
root.render(
  <App />
);
UseEffect
useEffect는 React Hook 중 하나로, 컴포넌트 생명 주기 함수 중 componentDidMount, componentDidUpdate, componentWillUnmount와 같은 역할을 한다. 기본적으로 useEffect는 컴포넌트가 렌더링 될 때마다 호출된다.
useEffect를 사용하면, 컴포넌트가 렌더링될 때마다 특정 작업을 수행하거나, 특정 상태가 변경될 때마다 작업을 수행할 수 있게 만든다. 이를 통해, DOM과 관련된 작업이나, API 호출과 같은 비동기 작업을 처리할 수 있다.
useEffect는 아래와 같은 형태로 사용되는데,
import React, { useEffect } from 'react';

function App() {
    useEffect(() => {
        // 작업 수행
    }, [의존성 배열]);
    return (
        // 컴포넌트
    );
}
useEffect의 첫 번째 인자로는 작업을 수행하는 함수를 전달한다. 두 번째 인자(의존성 배열)로는 배열 형태의 값을 전달한다. 의존성 배열에 전달된 값이 변경될 때마다, useEffect 함수가 호출되며, 만약 의존성 배열을 전달하지 않으면, 컴포넌트가 렌더링될 때마다 useEffect 함수가 호출된다.
useEffect는 React Hook 중에서 가장 자주 사용되는 Hook 중 하나이며, React에서의 비동기 처리에 필수적인 역할을 한다.
import Button from "./Button"
import styles from "./App.module.css"
import {useState, useEffect} from "react";

function App() {
    const [count, setCount] = useState(0);
    const [keyword, setKeyword] = useState("");
    const onClick = () => {
        setCount((prev) => prev + 1);
    }
    const onChange = (event) => {
        setKeyword(event.target.value);
    }
    console.log("SEARCH FOR " + keyword);
    const iRunOnlyOnce = () => {
        console.log("CALL THE API...")
    }
    useEffect(() => {
        iRunOnlyOnce()
    }, []);
    return (
        <div>
            <input value={keyword} onChange={onChange} type="text" placeholder="Search here"/>
            <h1 className={styles.title}>{count}</h1>
            <Button text="Click me" countUp={onClick} />
        </div>
    );
}

export default App;
위 코드에서 iRunOnlyOnce() 함수는 useEffect를 사용하기 때문에 처음에 한 번만 호출되지만, input창에 값이 들어 갈 때, 버튼 클릭을 할 때마다 "SEARCH FOR " + keyword 부분이 호출된다. 즉, useEffect는 언제 코드가 실행될 지 정할 수 있다.
function App() {
    const [count, setCount] = useState(0);
    const [keyword, setKeyword] = useState("");
    const onClick = () => {
        setCount((prev) => prev + 1);
    }
    const onChange = (event) => {
        setKeyword(event.target.value);
    }
    **useEffect(() => {
        console.log("CALL THE API...")
    }, []);
    useEffect(() => {
        if(keyword !== "" && keyword.length > 5)
        console.log("I run when 'keyword' changes");
    }, [keyword]);
    useEffect(() => {
        console.log("I run when 'count' changes")
    }, [count]);
    useEffect(() => {
        console.log("I run when 'keyword & count' changes")
    }, [keyword, count]);**
    return (
        <div>
            <input value={keyword} onChange={onChange} type="text" placeholder="Search here"/>
            <h1 className={styles.title}>{count}</h1>
            <Button text="Click me" countUp={onClick} />
        </div>
    );
}
첫 번째 useEffect는 단 한 번만 실행되고, keyword 하나를 두 번째 인자로 갖는 두 번째 useEffect는 조건에 맞게 keyword가 입력될 때 실행된다.
Clean up Function
function Hello() {
    function effectFn() {
        console.log("Created! :)");
        return destroyFn;
    }
    function destroyFn() {
        console.log("Destroyed! :(");
    }
    useEffect(effectFn, []);
    useEffect(() => {
        console.log("Created! :)");
        return () => console.log("Destroyed! :(");
    }, []);
    return <h1>Hello!</h1>
}

function App() {
    const [showing, setShowing] = useState(true);
    const onShowing = () => {
        setShowing(prev => !prev);
    }
    return (
        <div>
            <input value={keyword} onChange={onChange} type="text" placeholder="Search here"/>
            <h1 className={styles.title}>{count}</h1>
            <Button text="Click me" countUp={onClick} />
            {showing ? <Hello /> : null}
            <Button text={showing ? "Hide" : "Show"} countUp={onShowing}/>
        </div>
    );
}
useEffect를 사용할 때는, 함수 내에서 반환하는 함수를 통해 정리(clean-up) 작업을 수행할 수 있다. useEffect는 컴포넌트가 마운트(mount)되거나 업데이트(update)될 때마다 호출되며, 반환하는 함수는 컴포넌트가 언마운트(unmount)될 때 호출된다.
useEffect에서 CleanUp 함수는 컴포넌트가 DOM에서 제거되기 전에 이전 렌더링과 관련된 모든 리소스를 정리하는 데 사용된다. 이전 렌더링과 관련된 리소스를 정리하기 위해 다음 렌더링 또는 컴포넌트가 언마운트되기 전에 이 함수가 실행된다. 이는 네트워크 요청 취소, 이벤트 리스너 제거 또는 수행해야하는 기타 리소스 정리에 유용하며, effect 함수에서 함수를 반환함으로써, 컴포넌트가 제거되기 전에 이 정리 작업이 수행되도록 보장할 수 있다.